Wednesday, July 6, 2016

Secret to Joy

I'm really happy when creating, whether it's a painting, a piece of unique jewelry, a poem, a fabric whatever, or something else.  And you could say it gives me joy.  But that's not the deepest joy. The deepest joy comes from relationships.

First, there is my relationship with Jesus, who took my punishment so I could be declared righteous by His blood.  Then there are those relationships with others, the lateral relationships.  I mean those relationships with children, spouses, parents, siblings, cousins, aunts, uncles, in-laws (who eventually begin to seem like parents, siblings, and children), friends, and more.  If you feel down in the dumps, go pursue a relationship.

And oh, don't forget those strangers in the checkout line who become friends for a few minutes. That's all it takes to get an idea for a new project, or to just receive a smile to lift your spirits. Yep, relationships are the stuff of joy.  That's why I look forward to someday seeing loved ones again and nevermore experiencing the agony of parting.  It's because God made me that way. Relationships--created by God.


Saturday, June 25, 2016

Mission Trip to Guatemala

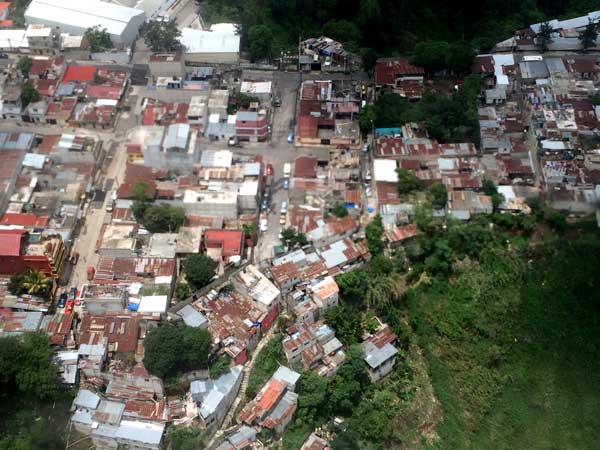
Recently, I took a trip to Guatemala--a mission trip, working with a group called Hope 4 Guatemala. Taking off from Houston, I noticed the tops of nice houses in their nice lawns.  Three hours later, we began to drop altitude over the beautiful, mountainous Guatemala. The tops of these houses were rusty tin.  There was cute couple sharing the row with me and he said this was going to be a tight landing because of the terrain.  We came down sharp and I could almost hear the "Urrrrk!" as we came to a quick stop.  It was fun.

Our hosts met us and our numerous bags with an "autobus."  Guatemala City apparently has no public freeways.  Twist. Turn. Turn. Twist. Turn within 3 inches of a corner.  I greatly admire the skill of the bus driver. After about 45 minutes, we came to the compound, a spacious house with dorm-style bedrooms.  The compound is on Lake Amititlán, and it is truly beautiful.

We ministered to a small village near Guatemala City. I will admit that it was an eye-opener.  I don't think of myself as materially rich, not at all.  But to many of these people, my modest dwelling would seem to be a palace.  I didn't have time to feel sad--no time for paralysis.  We needed to be about the Lord's work, performing the tasks that we had been anticipating for months.

While the men were building a small house for a family there, the rest of us taught Bible school, reading Bible accounts in Spanish, managing projects, teaching them about Jesus, and just talking to them in general. Here are a few pictures of what we did.


Over beautiful mountainous terrain...


About to make an exciting landing...


A fruit stand in the village.  Those carrots on the left were as big around as an average sized glass.


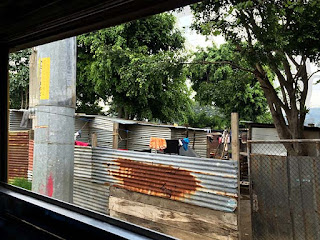
I don't want to show too much about the private dwellings, but this picture and the ones below will give you an idea.


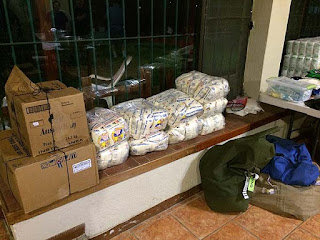
Folks gotta eat.  There is nothing quite like meshing with another culture.


Again, folks gotta eat. The picture above and the two below show some of the food donations. Thanks to a lot people in our church (and not in our church), we were able to provide NUTRITION for others!


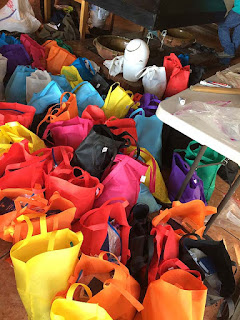
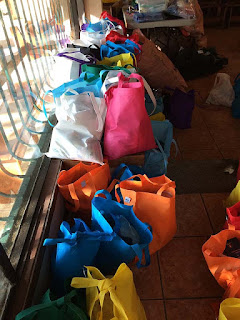
Yay!  Colorful bags with things people need, physically and spiritually. Thanks to the Gideons, we were able to include a Spanish New Testament with every bag.
At the end of Bible school, we passed out toy bags full of things that had been donated by friends in the USA.


Every generous act and every perfect gift is from above, coming down from the Father of lights; with Him there is no variation or shadow cast by turning.
--James 1:17 Holman Christian Standard Bible

Wednesday, May 21, 2014

How to Stitch Your Artwork Seamlessly in Photoshop Elements


When joining components of one artwork in Photoshop Elements, you do not have to settle for a file with an obvious seam where no seam should be. Using the Eraser and Clone tools, you can eliminate the seam manually, and with some practice, you can do it so well that no observer will guess that you have stitched the parts together. 

This works with artwork or
photos, but in this article I will refer to the subject as artwork.  At the end of this post, I include images that I have stitched together using this method.

This article assumes that you know how to get your artwork onto the
computer, and that you are somewhat familiar with Photoshop Elements. Before trying this exercise, please read through the entire article including the tips at the bottom. You may have some questions that will be answered there.

These directions focus on Photoshop Elements 7, but I formerly used version 2, and that is where I first began to practice this technique.

If you know how to place the layers together in one file, overlapping to match the edges, skip to Number 6. I now launch into the steps:
Instructions
Things You'll Need:
  • A copy of the Photoshop Elements program. This lesson mainly addresses version 7
  • Artwork that has been scanned in two pieces, which can overlap enough to give you some room to erase. Alternatively, you may use two photos that you would like to stitch together
  1. Step 1
Open Photoshop Elements and load the two "half files" of your scanned artwork. If your files have just been scanned and have not been saved, click "File > Save As" for each separate file and save it as a PNG or PSD. When your files have been saved, go back to the file menu and click duplicate for each file. (On older versions of Elements, the duplicate function is under "Image".) Close the original files, leaving the duplicated files on the screen. Now you won't have to worry about messing up your original files. If something goes horribly wrong with your file, you still have the original pieces.
  1. Step 2
Let's pretend the two artwork files are 2500x2000 (meaning 2500 pixels in width), and will be placed side by side. You're going to make a new file to house the two artwork files. I would make the new file 5200x2200 pixels, because I want to double the width and add a few pixels all around for elbow room.

Click "file > new > blank file." In the small box, enter 5200 pixels for width, and 2200 for height. Make sure it says "pixels" there, and not inches or something else. At the bottom of the box, you'll see "Color Mode" and "Background Contents." Keep the color mode at RGB. I always make the background transparent because the tiny gray tiles aid in placement.
  1. Step 3
Now you should have your two artwork files and a blank file with a transparent background, which looks gray and white. Click on the artwork file that will become the left side of the artwork. Just to make the move a little easier, make sure the artwork is side-by-side with your new, transparent file. If your tool strip is not showing, click "Window" and make sure "Tools" is checked. Then click the "Move Tool," which is at the top left of the tool strip on my copy of Elements 7. Place this cursor on the artwork file and left click. Holding the mouse button down, drag the picture completely into the transparent file. Then let go. A copy of this artwork file will be
in the new file, but will also still be in the file from which you took it.
  1. Step 4
To save RAM, close the picture files, keeping the transparent file with the artwork halves dragged in. In the transparent file, position the new layer (really the left half of the artwork) into a comfortable position in the left half of the file (comfortable for you I mean, not for the layer). Repeat step 3 with the right half of the artwork, placing it on the right side of the new file.
  1. Step 5
Now, move the pieces together, matching them to the best of your ability. In order to see holistically and in detail, you may have to zoom in and out on the view. Your arrow keys are valuable while moving the layers. They can move the pieces one pixel at a time. Of course, one of the pieces will overlap the other--that's what we want. Switch the arrangement of the layers, putting the lower one on top. Go with the arrangement that looks more natural. If one of the layers was scanned in a less than straight position, you may have to click "Image > Rotate > Custom" and nudge it just a little to straighten it. Do not worry about extra space around the outside, whether in the picture files or around the pictures, because you can crop it later.
  1. Step 6
You have now put the pieces together and arranged the stacking order for the best view. Still the view is not so great, because you can see a line where the pieces overlap. Time to pull out the eraser from the tool strip. Make sure you have chosen "Eraser Tool," not "Background Eraser," or "Magic Eraser." In the layers palette, select the top layer.

In the upper left of the main window of the program, click "Default Brushes" and choose a blurry brush. I normally set the opacity to 100%, although it will not be 100% in the blurry edges. The "[" and "]" buttons will change the size of the brush. Now you will carefully erase parts of the overlapping portion of the top layer.

You are trying to make the erased edges blend into the bottom layer so that it appears to be one piece. Be careful not to erase to the point of exposing the transparent background. Stay in the area of overlap. Zoom in and zoom out frequently; zooming out is the equivalent of stepping back to get the whole picture. Don't get frustrated; this may take some practice. I am left-handed and use my right hand on a mouse to do this.
  1. Step 7
Now you have erased the overlapping top section to the best of your ability. If you have not yet saved--you live dangerously by the way--you may want to save now. Then, go to "Layers" at the top of the main window and click "Merge Visible." You now have one layer.
  1. Step 8
Bring out the Clone Stamp Tool, which is on your tool strip. Use this tool to correct any portions that you could not erase to your satisfaction. When using the clone tool, I like to continue to move around with the Alt button--that's the button that sets the distance from donor site to receiver site. That will keep you from getting that double and triple patterned look that screams, "Clone abuse!"
  1. Step 9
Again, zoom out to digitally step back and get the whole picture. If you are satisfied, it's time to crop. Click the Rectangular Marquee Tool on the tool strip. If you want a certain ratio, go to the top of the main window and click Fixed Aspect Ratio" on the Mode section; set the desired ratio. Then, crop the picture. Immediately save the file in a loss-less format such as PSD or PNG. If you want smaller files and JPEGS for various purposes, duplicate your new file and close out the hard work that you have just saved, leaving the duplicate in the window. You have now eliminated the danger of ruining your new file, and you are free to create the smaller files you need.

·  Make sure you have a nice overlap in the scanned sections. The larger the overlap, the more leeway you have when erasing.
·  What if you have more than one section to merge? First, I would stitch two layers together and blend them with the eraser and clone tool. Then I would merge them to one layer. Then, I would add the remaining layers one at a time, to the already stitched and blended layers. With each added layer, I would blend and merge down before adding the next. I have found this method to be less frustrating. It is much easier than trying to marry four layers at once.

Below are a couple of samples of artwork stitched together in the manner that I have just described.

Sell Art Online
Photography Prints

Saturday, October 5, 2013

Things are getting exciting. It's Fall now, and Santa is peeking around the corner, trying to nudge the Thanksgiving turkey out of the way. This is one of my Santa portraits.
Photography Prints

santa art santa claus art artwork canvas prints artwork prints hand painted framed printsbeautiful greeting cards
beautiful metal prints

Friday, October 4, 2013

And here is a purple still life painting...I used to get daisies once a month, and painted them often. I think the flowers here look very much alive.
Photography Prints

still life art purple acrylic prints

The Southwest is in My Blood

I have visited the Southwest about ten times, give or take a couple. When I am there, the time goes by quickly. When I am away from there, the rocks, hills, and mesas call to me. This painting is an imaginary landscape with a partially imaginary rock wall, accented by a tower. The old ruins are made of rock.
Photography Prints

sky canvas prints starry night art

Tuesday, September 17, 2013

Still Life Paintings with Pears

Still life with fruit can be a beautiful form of expression. There is the shine, the texture, and the surroundings. In each of these pieces, there are golden pears. In one scene, an apple takes center stage.

Photography Prints
Photography Prints
Art Prints pears art artwork framed prints artwork posters hand painted posters
beautiful canvas printsbeautiful paintings beautiful posters

Saturday, August 31, 2013

Still Life Paintings

There is another side of this landscape painter, and it's still life:

Art Prints
Sell Art Online
Photography Prints Click on any of the art, and you can see more of my still life. Order some prints for yourself--or for your favorite art lover.

still life paintings still life canvas prints still life prints still life acrylic prints still life posters still life metal prints still life greeting cards

red paintings

Plein Air of Palo Duro Canyon, Near Amarillo Texas

Photography Prints

This painting is acrylic on stretched canvas. Clicking on the picture will take you to the prints. We were staying in the Lighthouse cabin at Palo Duro Canyon in the Texas Panhandle, and I wanted to paint on location! The wind was strong, but I was determined. I did manage to paint most of the scene en plein air, adding touch-ups later.

It was a great experience. On the first night, we heard thunder, rain, and wind. I opened the door and peered out. There was no rain, no thunder, and no lightning, but much wind, bounding down the canyon and whipping around the rock cabin. I went back to sleep, to the sound of pounding--wind!

On the second day, I found a small snake in the living area of the cabin. It had been hiding under my shoe. We managed to see him safely out of the building.


palo duro art rock art desert paintings texas paintings texas prints rocks paintings texas art palo duro canyon art

Monday, May 6, 2013

Finn Hotel of Pleasant Hill, Louisiana is Popular

Sell Art Online This old hotel once stood by the railroad tracks in Pleasant Hill, Louisiana. Those old enough remember it as an old building in disrepair. But it was once a beautiful hotel with livery stables, waiting to shelter weary travelers. I used an old photo as a reference, deliberately putting emphasis on the building itself.

Wednesday, March 20, 2013

McNeill Street Pumping Station

The McNeill Street Pumping Station went into operation in Shreveport, Louisiana in the late 1800's. It still stands in downtown Shreveport, with much of its equipment intact.

Art Prints">

shreveport art louisiana posters
louisiana framed prints louisiana acrylic prints...louisiana metal prints
louisiana greeting cards nostalgia art red canvas prints

Saturday, March 9, 2013

How to Store Earrings: One Way Among Many


I made this a few months ago to hold those earrings that keep hiding in the jewelry box. Simply staple a piece of window screen to an ornate frame. You will need a heavy duty stapler, of course. This frame is 14x11. I now wish I had chosen a larger frame.

Art by Lenora

Saturday, March 2, 2013

Tuesday, February 12, 2013

Art of the Southwest

The United States Southwest is a wonderful place. It is also a state of mind. I am fascinated with it and have painted several art pieces of that huge area. FineArtAmerica.com has a fascinating selection of Southwest art. It can be found here: southwest art rocks art brown paintings hand painted canvas prints stone paintings stone canvas prints desert art arches national park art
I really love old buildings. All the images below can be found at LouisianaPainter.com

nostalgic prints
http://syrupywine.blogspot.com/
nostalgic framed prints

LouisianaPainter.com

old buildings art

ruins art

hand painted paintings louisiana art prints castle paintingsruins paintingsruins canvas printsruins prints

Sunday, January 27, 2013

Art and More Art

Much of my artwork can be seen at fineartamerica.com I am adding more every day. Here are some examples:
Sell Art Online Old ruins in Tasmania Photography Prints Oakwood Cemetery in Jefferson, Texas

A lot of the artwork on Fine Art America is photography, and while that can be beautiful, do not deprive yourself of hand painted art. The hand of the painter on the brush, using real paint that gets on their hands and on their easel and well as on the canvas, is a time-honored tradition. Many of the artists, including this writer, have original paintings available as well as reproductions of various types, such as stretched canvas, metal, and archival paper.
hand painted printsruins framed printsruins acrylic printsruins metal printsruins greeting cardsruins posters

Get Back on Weight Watchers!

I have slacked off in the weight maintenance department. I am still attractive and in a tight 4 at just over 5 feet, but there is an alarming trend going on. It really is harder to maintain than it is to lose--at least for me. So I must step on the scale and go back on the plan. But--instead of 26 points a day, I'll go upward to about 30. I probably need to lose less than 10 pounds anyway. So, if you're on a gaining trend, stop! and go the other way now. Regain that momentum that helped you lose. The first step is always the hardest, as we well know.

Monday, December 31, 2012

Louisiana Artwork

Fine Art America is a wonderful art site, full of reproductions and original art, including the art of Louisiana, my home state:

louisiana paintings
Beautiful paintings! 

landscape art mardi gras art louisiana art
hand painted prints blue paintings

Sunday, July 10, 2011

Sticking to the Diet at Applebee's.

Today I went Applebee's restaurant.  I wanted to stay the course, and not derail all my hard work or waste the money it cost to join Weight Watchers.  I did a little internet homework before leaving the house, and when in the restaurant, I chose a peppercorn steak meal for about 400 calories. I drank a Coke Zero and had no dessert.   I think I did well.  My stomach seemed to think differently. 

It seemed to be thinking, "Hey wait a minute, we're not done yet!"  That comes from being used to eating more, and having something sweet after the meal, even if it's just a peanut butter and jelly sandwich.  I ignored the stomach.  We had our drinks poured into Styrofoam cups and headed for the art show. 

I had a couple of small artworks in the show, but the most prominent thing to my eyes was the table of cookies, cake, dip, and more.  I had a small dish of fruit and that was all.  My prayer is that I can continue in this vein of good behavior. The Bible says to resist the devil and he will flee from you.  I can't remember reading anything in there about cookies. 

Friday, July 8, 2011

After One Week on Weight Watchers

I have been on Weight Watchers for one week.  At the beginning, I weighed myself, and the scale said 158 pounds.  It is hard to admit that.  When I tell people how much I weigh, they don't believe me, so I must hold the weight pretty well.  Still 158 pounds is noticeable if you are just under 5'1".  

Today I weighed myself and the scale is now at 150.  So during the first week, I lost eight pounds.  I realize that is a kick-off weight loss, and that I will not lose that much every week.  I also know that I should not lose that much every week.  But I'd like to lose an average of two and a half pounds a week.  If I lose less than that, it's still progress. Slow and steady wins the race.  Just ask the tortoise! 

I have begun to step up the activity.  I have lots of nice excuses for not doing that.  The road is too busy to walk.  It's too hot to walk outside; I'll get a heatstroke!  Gas is too expensive to drive to the mall to walk.  If I join a gym, it will just be somewhere else to have to go, and the money will be wasted, not to mention the aforementioned gas prices.  So what is a determined loser to do?

I have an indoor step ladder.  It's in the spare room.  I climb the first two steps and then back down, over and over.  And over.  Right now I'm only doing it for 10 minutes at a time, while listening to the Kindle's read-aloud feature or watching something on my netbook.  If you try this, make sure the ladder is locked into the open position.  Use a sturdy one, and carefully see how it reacts when you first try it.  I'm going to get on it right now.